
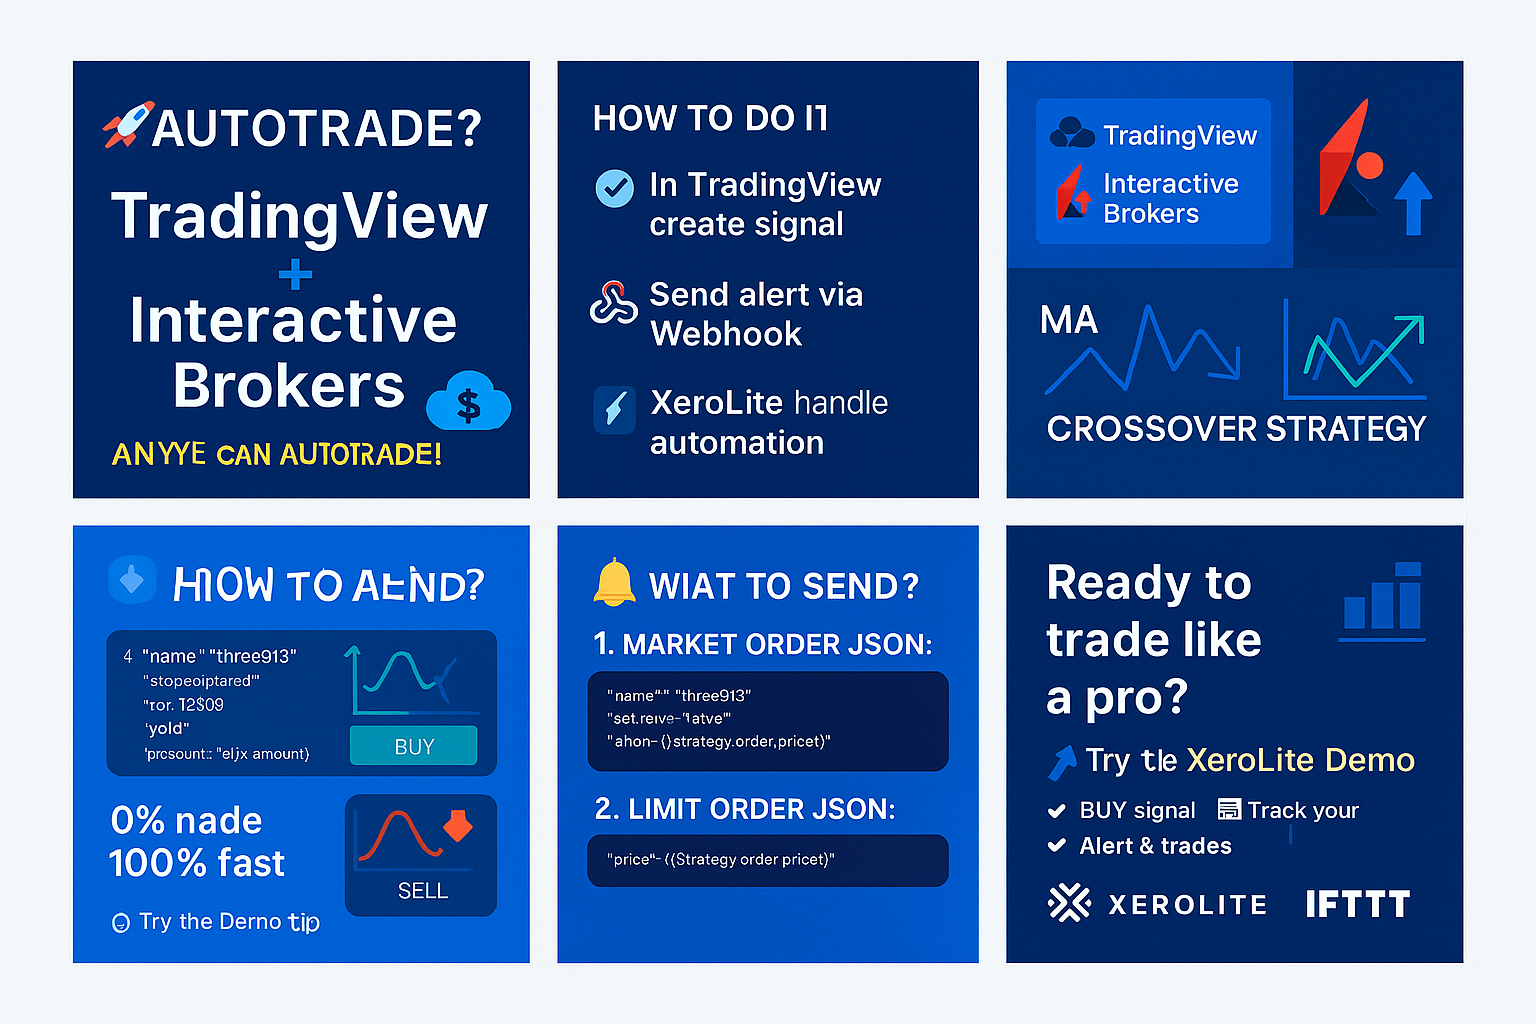
📈MA Cross Strategy Automation
Ever wish your trades could place themselves — even while you’re away? Thanks to tools like TradingView, webhooks, and automation platforms like XeroLite, that’s now possible — even for beginners.
- Build a simple Moving Average Crossover strategy in TradingView
- Send real-time trade alerts via webhooks
- Automatically place trades on Interactive Brokers — with no coding required
✅ No coding
✅ Beginner-friendly
✅ Trade while you sleep
🧠 What Is the Moving Average Crossover Strategy?
A Moving Average (MA) is one of the simplest and most widely used tools in technical analysis. It smooths out price data over a period of time, helping traders identify the direction of the trend without the “noise” of daily price fluctuations.
There are two common types:
- Simple Moving Average (SMA): Takes the average of the closing prices over a set number of periods.
- Exponential Moving Average (EMA): Gives more weight to recent prices — reacts faster to price changes.
- Fast MA (e.g. 10-period): Follows recent price
- Slow MA (e.g. 30-period): Follows longer-term trend
🔄 Fast MA vs Slow MA
- Fast MA (e.g. 10-period)
- Reacts quickly to recent price changes
- Useful for spotting short-term trends or momentum
- Slow MA (e.g. 30-period)
- Moves more slowly
- Represents the broader, long-term trend
How Does a Moving Average Crossover Work?
A crossover happens when the fast MA and the slow MA intersect. This is often used as a buy or sell signal.
✅ Buy Signal
When the Fast MA crosses ABOVE the Slow MA, it suggests that momentum is shifting upward. This is called a bullish crossover — a signal to consider entering a long (buy) position.
❌ Sell Signal
When the Fast MA crosses BELOW the Slow MA, it indicates possible downward momentum. This is a bearish crossover — a signal to consider selling or shorting.
💡 Why It Works for New Traders
- Removes emotion: You follow the signal, not your feelings.
- Easy to understand: Just track two lines crossing.
- Catches trends: Helps you ride upward or downward moves early.
This method helps catch trends and avoid emotional decisions — perfect for those new to trading.
💻 Step 1: Create the Strategy in TradingView
Login to TradingView and open the “Pine Editor.” Paste this code:
//@version=6
strategy("MA Crossing Strategy", overlay=true)

fastMA = ta.sma(close, 10)
slowMA = ta.sma(close, 30)

plot(fastMA, color=color.green)
plot(slowMA, color=color.red)

if ta.crossover(fastMA, slowMA)
    strategy.entry("long", strategy.long)

if ta.crossunder(fastMA, slowMA)
    strategy.entry("short", strategy.short)

Click “Add to Chart” to view your signals. 🔍 Pro Tip: Adjust the periods based on your trading speed.
📊 Step 2: Backtest Your Strategy
Use the Strategy Tester in TradingView to analyze performance:
- Total profit/loss
- Drawdown
- Accuracy
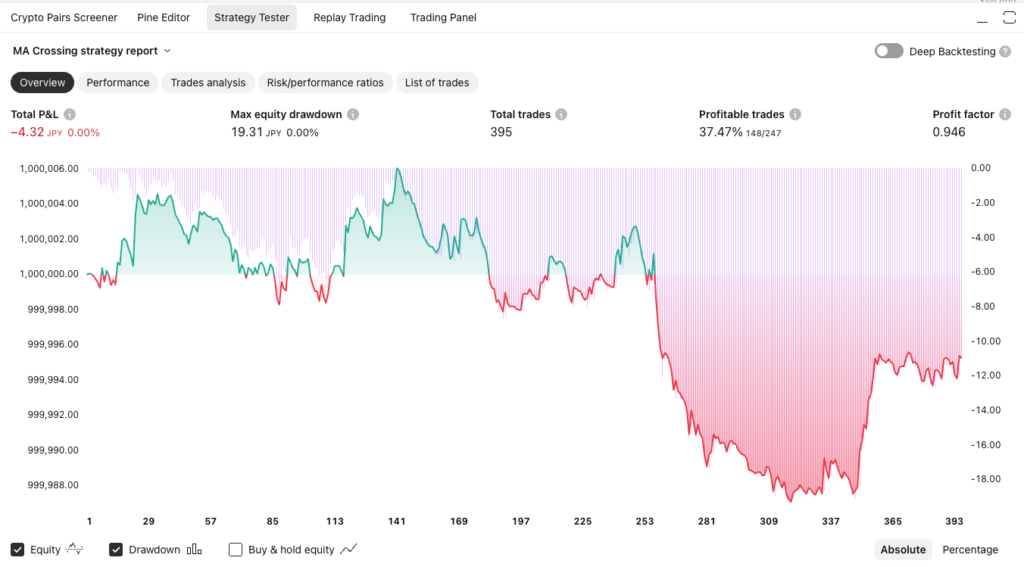
This helps you refine before going live.
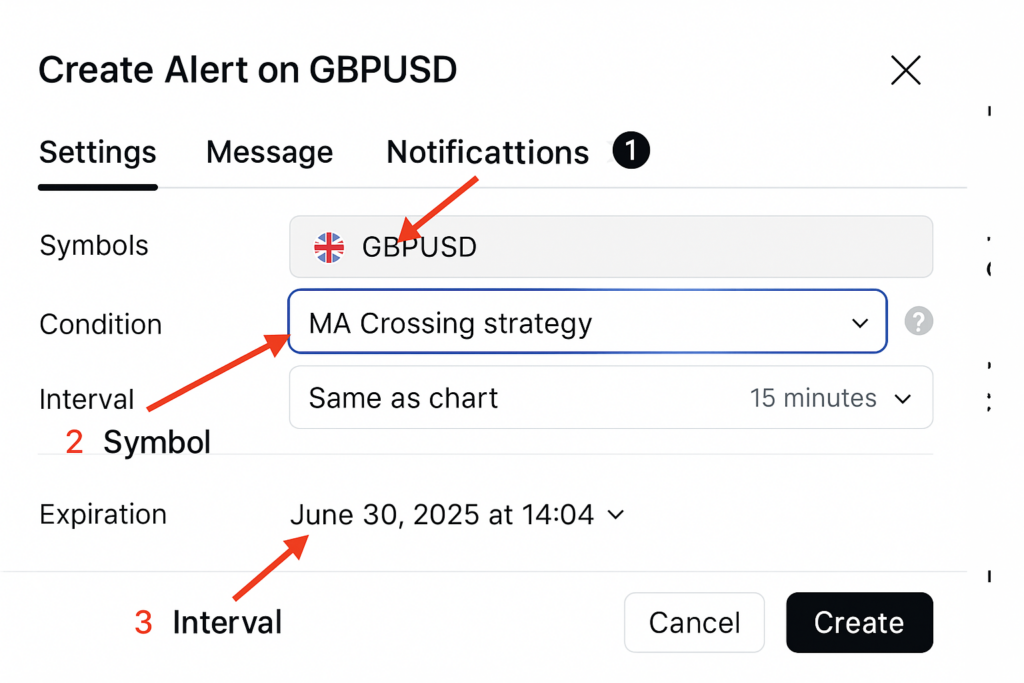
🔔 Step 3: Create a Webhook Alert in TradingView
- Click the “+” Alert icon at the top left of your alert log panel.
- In the Settings tab, set Condition to your strategy (e.g. “MA Crossing Strategy”).
- In the Message tab, set a unique alert name and paste a valid alert JSON.
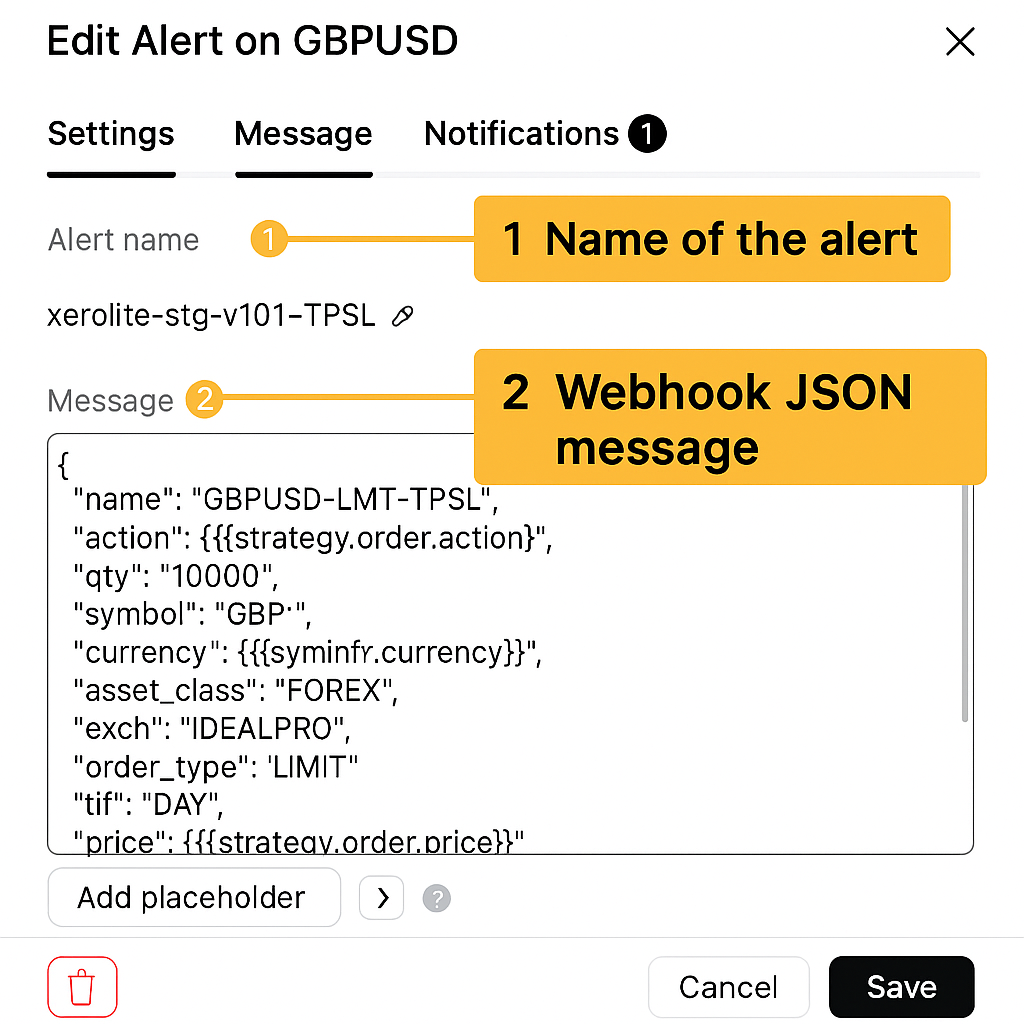
- In the Notifications tab, paste this webhook URL:
https://stgxerolite.xeroflex.com/api/order/place-order?x-api-key=YOUR_API_KEY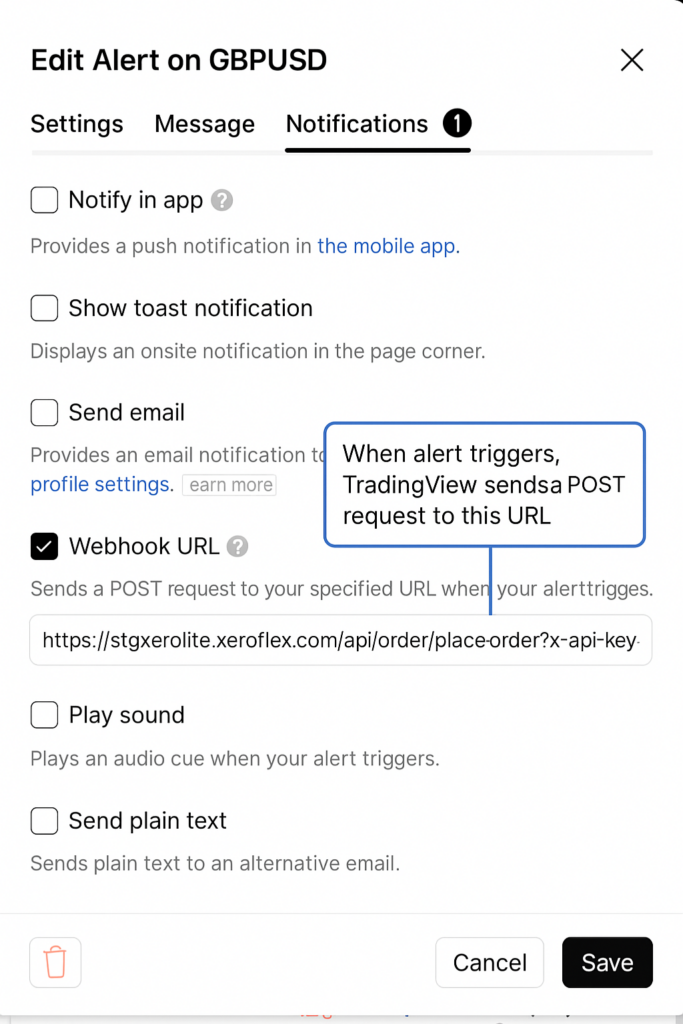
👉 This webhook URL is from the XeroLite demo platform. You can use it to test your TradingView alerts in real-time. It allows you to simulate order placements safely without connecting to a live brokerage account.
💡 To test: Paste the demo webhook URL into your alert. Then log in to XeroLite Demo and check the Alert Log and Transaction tab.
🚨 Important: Use a unique name in your alert (e.g. "name": "TestUser123-GBPJPY") to avoid mix-ups.
💡 Always log in to XeroLite Demo to get the latest webhook URL.

🧾 Step 4: Customize the Alert Message
🔹 Simple Alert (Market or Limit Order)
{
  "name": "USDJPY Alert",
  "action": "{{strategy.order.action}}",
  "qty": "10000",
  "symbol": "USD",
  "currency": "{{syminfo.currency}}",
  "asset_class": "FOREX",
  "exch": "IDEALPRO",
  "order_type": "MKT"
}
🎯 Bracket Order (With TP/SL)
{
  "name": "GBPJPY-LMT-TPSL",
  "action": "{{strategy.order.action}}",
  "qty": "10000",
  "symbol": "GBP",
  "currency": "{{syminfo.currency}}",
  "asset_class": "FOREX",
  "exch": "IDEALPRO",
  "order_type": "LIMIT",
  "tif": "DAY",
  "price": "{{strategy.order.price}}",
  "sl_offset": 0.0005,
  "tp_offset": 0.0005
}
🚀 Step 5: Automate Execution with XeroLite
XeroLite is a lightweight tool that bridges TradingView and Interactive Brokers. When your webhook fires, XeroLite will:
- Receive the webhook
- Authenticate and validate the alert
- Send the order to IBKR via TWS/IB Gateway
- Log the action for monitoring
✅ No coding. ✅ No browser plugin. ✅ Just pure automation.
Want to test first? Try the XeroLite Demo today — risk-free!
💡 Why Beginners Love Automated Trading
- ✅ Emotion-free trades
- ✅ Works 24/7
- ✅ Hands-off execution
- ✅ Learn gradually
📦 Recap – You’re Now Automated!
- ✅ Build a TradingView strategy
- ✅ Set webhook alerts
- ✅ Execute trades via XeroLite
Start small. Stay consistent. Let XeroLite handle the rest.